
Guitar Construction
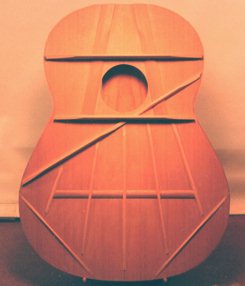
Top strutting: There is a school of thought about building an acoustically neutral top by adjusting the top to nullify unwanted frequencies, thereby removing the erratic sound waves without interfering with the intended frequencies. I believe there is some merit to this concept. I try to remove the harmful sound frequencies by intuitive skills that have been developed over a period of time. When I glue the struts on the top, I get it as acoustically neutral as possible. You’ll know when you have arrived by tapping the top in the general area of the bridge on either side and in the middle. I contour the struts to tune the top to a certain key, but with a slight non-frequency before gluing it to the sides. When I hear a thump (when tapping the top) rather than a ring, I proceed with gluing the top to the sides. When the guitar is finished, the key I tune the top to is F-F# on the 4th string. The cavity resonance is F-F# on the 6th string, and the back should tune out to about A on the 3rd string.

Top thickness: Some Rodriguez guitars have only very slight variations from the center of the top to the outside edges. From a sample of a 1976 model, I found that the top was about 2.1 mm thick in the center from the sound hole to a little behind the bridge area, and across the bridge to each edge of the tie block. From the bridge tie block edge across the top (on either side) to the end of the bridge arm, the top then declined on a taper to about 2 mm to the outside edge, and dropped off a little to 1.9 mm on the very edge. My experience tells me that this thickness is fine if a fairly stiff spruce top is used, but a cedar top would be a little too thin for long-term stability.
Inserting the rosette and top graduation techniques:
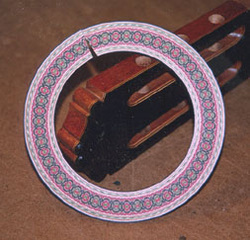
I install the rosette in a top that is 5mm thick and scrape it when dry to where it is smooth with the top. Afterwards I run the top through the sander with a special setup to thickness it. Using a butcher’s block that is completely smooth on both sides as a base to put the top on while it goes through the sander, I set up the butcher's block with strips of tape in the areas that will guide the sanding of the top to the desired thickness. I use a wooden dowel about 3/16th to index the center of the rosette hole to hold the top while it is on the block. This way the top is not glued down to the block, and it can be removed and turned over to sand the other side. I use 150 grit sandpaper for the sanding. This technique sands off most of the wood and leaves it very close to the correct thickness. After the guitar is glued together, the rest is done by hand for the final stages of the tuning process.
I install the rosette in a top that is 5mm thick and scrape it when dry to where it is smooth with the top. Afterwards I run the top through the sander with a special setup to thickness it. Using a butcher’s block that is completely smooth on both sides as a base to put the top on while it goes through the sander, I set up the butcher's block with strips of tape in the areas that will guide the sanding of the top to the desired thickness. I use a wooden dowel about 3/16th to index the center of the rosette hole to hold the top while it is on the block. This way the top is not glued down to the block, and it can be removed and turned over to sand the other side. I use 150 grit sandpaper for the sanding. This technique sands off most of the wood and leaves it very close to the correct thickness. After the guitar is glued together, the rest is done by hand for the final stages of the tuning process.
Setting the struts: The struts play a serious role in the tone, but most builders are unsure to what extent. The struts are used for stiffeners, but they are important for so much more. After the top is graduated properly, the guitar is strung up to concert pitch, and then the builder will have to go through the sound hole to adjust the struts for the top equilibrium and sound. The far outside bass fan strut and the outside treble fan strut are the balance for the top. The thinner the bass fan is in height, the deeper the tone. Thinning the outside treble fan will balance the bass.
Graduating the struts and tops: The struts play a serious role in the tone, but most builders are unsure to what extent. The struts are used for stiffeners, but they are important for so much more. After the top is graduated properly, the guitar is strung up to concert pitch, and then the builder will have to go through the sound hole to adjust the struts for the top equilibrium and sound. The far outside bass fan strut and the outside treble fan strut are the balance for the top. The thinner the bass fan is in height, the deeper the tone. Thinning the outside treble fan will balance the bass.
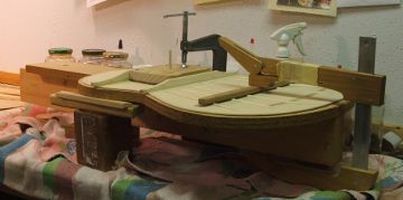
There is a point of acceptance, so you don't want to go too far with it. Keep in mind that very little wood has to be removed to get a proper balance. Marcelo Barbero used salt on his finger to do adjustments, but I use a small piece of 150 grit garnet taped to the tip of my finger. Sometimes just one sweep of the finger will bring the tone into balance. You may also want to make some little sanding gigs that will hold to the contour of the struts. You will need a flat stick with sandpaper on it, and also a sand paper stick that is the shape of the strut. All of the sticks should be easy to hold and be accessible to get through the sound hole. There is a way to learn this process, but you have to be willing to destroy a guitar top if necessary. This procedure is not for the faint-hearted, because it takes some practice to get it right.
The last bit of adjustment can be done with the sandpaper on the finger tip. Take your prototype guitar and start doing little minor adjustments until you get an idea how the sound moves around. Stay away from the middle strut unless you are doing a flamenco guitar. The flamenco guitar should be designed with even struts that are thicknessed the same. If you are going to taper the top a little on the outside edge of a flamenco, then thin the top of the middle strut just a little to compensate. Remember, if you get one side of the guitar too unbalanced, then you will have to sand a little on the other side to counterbalance it.
There are several ways to adjust this pattern. I've seen a 90's top that was adjusted thinner in the center and an early 1970's Rodriguez that was adjusted at 3mm in the center of the top, and then tapered to 2.5mm at the outside edges.( However, I found that the 70's instrument adjustment was a little too extreme, causing a more brittle treble that would not be desired for a good balance.) To me the .3mm difference from the center to outside edge is more in line with a good balance, and allows the top a little thickness. This in turn causes a hollow sound in the treble and bass, but without disturbing the overall balance by going too far with the graduation techniques........... I have finished out many cedar top guitars that are about 2.3mm in the center of the top, and graduated to the edges at 2mm. They are excellent guitars, with a lot of volume, great clarity in the trebles and bass', and a beautiful Southern Spain sound.
When it comes to tonal adjustments; the plain and simple fact is that the final top adjustments play the most important role in every guitar. This is where in my opinion, the builder's own ability is apparent, as the tone of each guitar is highly dependent upon his/her intuitive skills.
Welcome to the Web page of Tom Blackshear Guitar Builder San Antonio Texas
